
Here is the final version of the George animation test uploaded to you tube.
http://www.youtube.com/watch?v=Z90aVT3oXHE
I think in the final analysis I would say there are some problems with the lip sync, where the mouth is to fast or two slow, but apart from that I am happy with it and will leave it as is. On to rigging the rest of the cast!
Thursday 29 July 2010
Wednesday 28 July 2010
Wednesday, 28 July 2010
Pretty much finished the animation test for George. I had some trouble matching the mouth movements to the sound file, but this was due to lack of experience rather than any problem with the UI or morphs. The only problem I had with the rig was the use of cloth on the earphone wire,. No matter what I tried I couldn’t get it to compute therefore opted for some controllers linked to the wire at different lengths using linked xform, to move them wire slightly where necessary. It doesn’t have that dynamic I wanted, but the effect is not worth the amount of time it would take and problems caused with the cloth modifier. The renders will take another 16 hours, for the 30 seconds, which is not that bad time wise. This experience has given me more confidence on working on the On the Line Animation and Lip Sync, and am quite happy with the progress. Comet Cartoons 3d help on animation (a case study) and his lip sync tutorial greatly guided me through this first animation test. There were some tweaks in the process also, such as making the inner sleeve ends black rather than the same texture as the jacket. But apart from that the morphs seem to work well, and I am happy with the degree of emotion the character reflects. Anyways here’s a render from the scene.


Sunday 25 July 2010
Sunday, 25 July 2010
I Began working on the short animation test for George today, using sound from the movie Death at a funeral, currently I have just finishedished the blocking out of the animation and added some follow through and anticipation on the arm and head movements. Not much to show and will leave rendering the scene till its finished.
Saturday 24 July 2010
Saturday, 24 July 2010
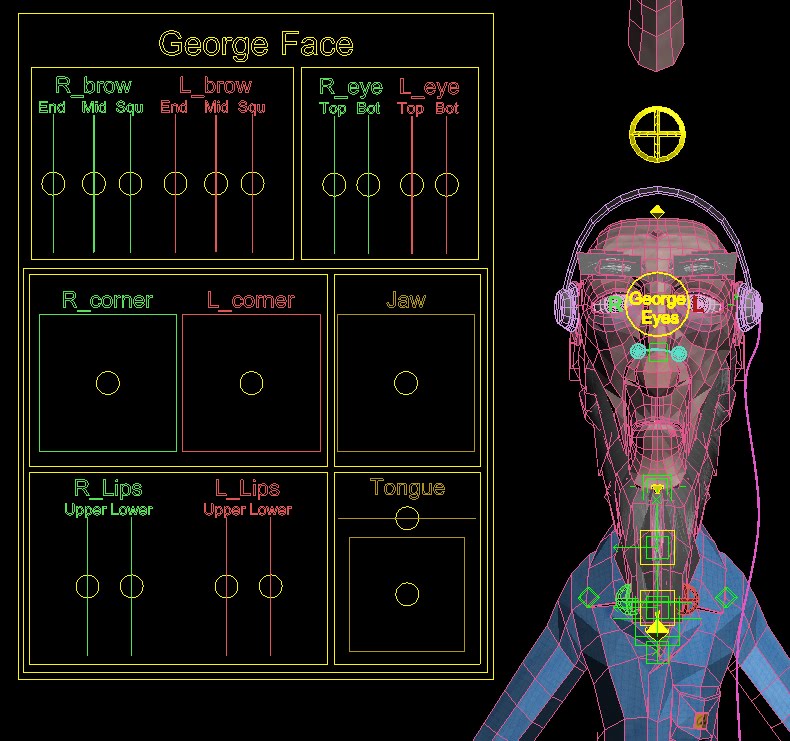
I finished the Ui today. And found a fault when rigging the eye lids. Inside the eye lids the mesh is not welded and polygons float around the eye lid. I cant go back now and redo the mesh since its far to far along, and this must have been a bug in max some where down the line, since I always check my meshes (stl check) when they are ready. Anyhow I don’t think the problem could become worse, and therefore am plodding onward. I just hope the mesh doesn’t explode or something latter down the line because of this bug. I guess I should have triple checked the model before rigging. Anyhow here’s a shot of the Model with morphs and UI, and the final Ui. The UI began as a tutorial from Paul Neales Dvds on rigging, and latter I added some more components from the stop staring book, so I had a good range of morph targets to rely upon.
I have decide to spend a week animating the character next. It will make me a few days behind, but its best to test the rig and UI for any issues before building the rigs for the other characters.


I have decide to spend a week animating the character next. It will make me a few days behind, but its best to test the rig and UI for any issues before building the rigs for the other characters.

Friday 23 July 2010
Friday, 23 July 2010
Rigged up the jaw of George and after animating a small sequence of jaw movements I tested the idea of using cloth drivers on the mesh for the beard and earphone wire. However after tests I feel it is not producing the results I am after, and therefore have decided to try a spring system with a bone of the jaw for the beard. However im rather stuck with the earphone wire, since it is connected in two places, with one end going into a pocket… The only way I can see of being able to produce decent results is to animate by hand the end to the wire, and create a cloth simulation for the sequence. Since I can’t see a way of connecting the wire to the vertex of the pocket of the character with the correct weighting to follow the pocket as it deforms.
I ran a number of simulations using a cloth and skin wrap to the wire with mixed results but in the end decided it worked well enough to use. The earphones are only used by George and Ian, with Ian taking of his earphones, which will be quite difficult, but I am confident I can run the simulation, and set states for the earphone wire, and if worst comes to worst I could always replace the sim with a morph.
I also rigged the jaw up to one UI. I am a little worried about how tying all the UI items together will work well enough to perform lip sync believably, but I can always add in UI elements latter if necessary after further testing.

Thursday 22 July 2010
Thursday, 22 July 2010
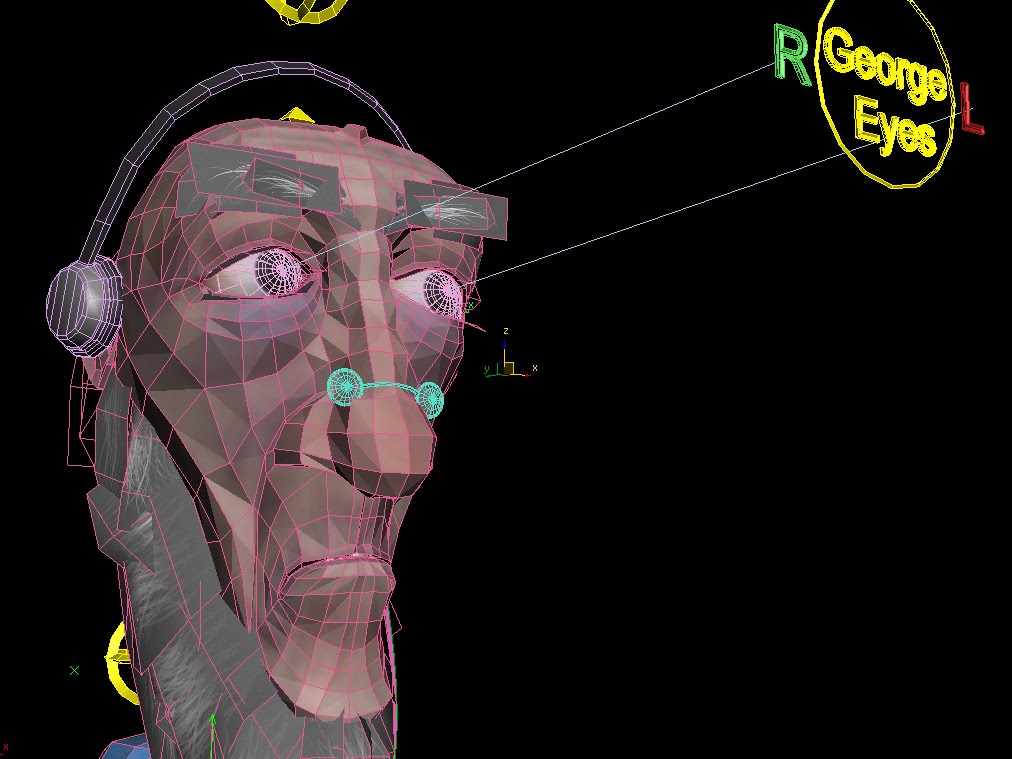
I have finished skinning the character George now and added the eye controls. Next step is the morphs and UI, a first for me so I am reading up as much as I can on the subject. The book stop staring, although in Maya is a great help in the decision to go for a blend facial UI as well as Paul Neale’s rigging dvds.
The skiing went ok, there were a few problems with the belly area deforming when the character was put in a sitting position. I tried using a morph deformer in skin, however since the bones were linked to helpers rather than other bones it would not accept it as a valid joint (I think) any way I fixed the issue by using stretchy bones from the thigh to the belly.

Here is a few test renders with the eyes rigged up and eye dilation, bellow that is a shot of the character in a pose, just showing deformations. I am unsure as yet if to create the morphs first and UI and add the beard cloth driver last, or the beard cloth driver before the Morphs. I think I will adding everything else before the cloth beard and see how that goes,. Therefore if it does not work as I had hoped I can add either a spring bone to the beard or another morph target for some sway.


Tuesday 20 July 2010
Wednesday, 21 July 2010
Today I finished of the rig as much as I could before the skinning. I again am following Paul Neale’s DVD’s on rigging in max and am learning as I go. I created in the past two rigs, one for a female character, which I made from scratch without help, and although it was functional really lacked a full range of motion. The second for a tooth fairy character that again had a few faults, and this the third, seems to be quite smooth in its movement. After I have created the UI and skinned George I may record him in a variety of poses with different lighting, so I can test various lighting solutions with the skin shader and test the movement and flexibility of the rig and any problems with the skinning.
Anyhow today there were a few little problems with the rig, a bit of scripting went wrong and took some time to find the faults, but I am learning and new to scripting as well as rigging. If only everything could be done with wiring! Anyhow I am of, here is a screen cap of the rig so far. Tomorrow I will be skinning! Oh I also hit on a problem with the character George and Ian with the rig for the earphones and earphone wire, in which the wire would move dynamically with physics. I originally intended to do this by hand, but after re-rigging a older character with a skin wrapped cloth driver I think this will work much better, leaving less work to me, yet more work for the computer.

Anyhow today there were a few little problems with the rig, a bit of scripting went wrong and took some time to find the faults, but I am learning and new to scripting as well as rigging. If only everything could be done with wiring! Anyhow I am of, here is a screen cap of the rig so far. Tomorrow I will be skinning! Oh I also hit on a problem with the character George and Ian with the rig for the earphones and earphone wire, in which the wire would move dynamically with physics. I originally intended to do this by hand, but after re-rigging a older character with a skin wrapped cloth driver I think this will work much better, leaving less work to me, yet more work for the computer.

Monday 19 July 2010
Monday, 19 July 2010
Sometimes its really great to have a few days away from it all, and come back not feeling that my work is completely terrible. Anyhow rigging! I had planned to have a complete George rig done by today and I am only half way through,. Had a major problem with mirroring bones to the opposite leg, and adding the same parameters, such as stretchy legs. They just wouldn’t stretched. In the end after a few hour of mussing and mirroring and redoing, I realised in the first instance I had added the parameters to the x rotation not position, and before that the mirroring was not flipped. Ah well, just getting tired and doing the wrong things. Anyhow I redid the stretchy legs on both legs at the same time, I figured if it failed I could just leave it out, but it worked!!! I will update more in another hour, going to try and get the new spine and arms done by tonight.
Well spines done but arms are for tomorrow, then skinning. I don’t really see much point taking a screen shot for the rig as yet, but I suppose it shows more development. For now im using Paul Neale’s Dvd on rigging, and some internet tutorials when I am stuck, or the user reference of Max, but I am hoping by the end of the 10th rig i should be quite appt without having to use tutorials

Well spines done but arms are for tomorrow, then skinning. I don’t really see much point taking a screen shot for the rig as yet, but I suppose it shows more development. For now im using Paul Neale’s Dvd on rigging, and some internet tutorials when I am stuck, or the user reference of Max, but I am hoping by the end of the 10th rig i should be quite appt without having to use tutorials

Thursday 15 July 2010
Thursday, 15 July 2010
Finished the Fly Audrey featured outside the cave scene. This will be the final full character other than the silhouettes which I also have completed. For the fly I uved and gave it a basic texture, nothing fancy, just a quick one day in all to model and texture it. The silhouettes I reedited Darren and Ian for two silhouette characters that I can swap and interchange through the line. . Going to have the weekend off, a celebration of finishing all the characters, and begin the next phase, the rigging of the characters on Monday. Anyhow here are the renders


And the silhouettes


And the silhouettes


Wednesday 14 July 2010
Wednesday, 14 July 2010
I have created the first of the two insects, a centipede, and currently working on the second (a fly). Had some trouble trying to find a nice quick shader for the insect without having to uv map it and texture it by hand. In the end a combination of a car shader, and skin shader’s were quiet effective. The character will only be seen by moon light so I think it will have a really interesting effect.


Friday 9 July 2010
Saturday, 10 July 2010
I have finished Audrey Moth. Quite happy with how it looks, I was unsure to make the face shader’s a human skin shader that merges backwards to fur where the head connects the body but in the end opted for the same shader throughout the model. I used the basic skin shader to give some nice backscatter on antenna and legs without reflections on the fur. The moth is based on the Hawk moth with the same marking on its tail/back. I will probably create the making of video on Sunday, however it will be somewhat short since the video recording software crashed when I was making it, therefore the uving of the character did not record. Happily I am using some music from a friend for the making of though, so should be quite good. Anyhow here’s the renders.


Wednesday 7 July 2010
Thursday, 08 July 2010
Here are two making of videos for Ian Elm
http://www.youtube.com/watch?v=IahMxONlFKY
and Darren Elm
http://www.youtube.com/watch?v=Zx3fTJ5obl8
I will post them on the actual website tomorrow. Just one more character to go and its onto the insects and silhouettes. Doing well at the moment, caught up and sorting out any problems I am running into. Little worried about how I will be rigging, but it’s a learning process, and building the rigs will be fun, and after ten rigs I should be quite apt!!
I began Audrey moth today as well, and began looking into how her mouth should be formed. I watched the first episode of Doctor who when it aired, and loved the mouths of the creatures, so tried to create something similar with sharp pointy teeth that in real life would just cut through the upper and lower jaw. I also researched into the blood of moths and skin colour to clarify how the shader should look for the mouth, this is what I have come up with so far, I may change it latter if the shader doesn’t look good on the final model, but so far im quite happy (moths have green blood).

Anyhow tomorrow I am going to rework some of the website and add the videos, wont take to long, then uv map the moth and take it into Zbrush, just a little detailing around the face and wings, the majority of normal map generation I will do with the hair texture in Photoshop, probably Friday, leaving the weekend free for my birthday!
Here is a wire

And here is a clay render of the Audrey moth

Monday 5 July 2010
Tuesday, 06 July 2010
I am rather tired been working solidly all day to get the Darren Elm character finished so I can get back on track. Hopefully I can make sense but I am lapsing into sleep!!
Ok renders..
Here is the finished body, quite happy with the look, but perhaps will adjust the shoulders when rigging.

I decided that the cowl just wasn’t working, so thought of the best way to have intertwined leaves made into a cowl in 3D. in the end opted to cut out the cowl from the original mesh, and weave it by hand, adding some dried leaves and grass texture for the cowl and changing it to a skin shader, so it has really nice back scattering effects.


The helmet was taken by the Darren Elm from a dead ant carcase and reshaped. I therefore researched into the pigment of ants, adjusting it slightly to be more red, and again opting for a skin shader to produce a nice effect.
The bones seen here and the bones as jewellery I decided to reuse the tooth shader from the jaws with a different texture, which worked quite well.

Bellow is the final Elm design

A wire frame of the creature


A final render


And the feet which feature prominently in the running sequence in Darren’s first dream

In the end I opted to rework the shader for the ant helmet, to give it more backscatter

And that’s it, bed now. Audrey moth tomorrow
Oh I also reedited Georges Cowl to be the same as Darrens
Saturday 3 July 2010
Saturday, 03 July 2010
Found a number of ways around the seams problem, which I will test latter with the Darren Elm character.
http://www.zbrushcentral.com/showthread.php?p=434721
Mainly cranking up the over paint seams to be the quickest and easiest. Or if that doesn’t work
http://forums.epicgames.com/archive/index.php/t-712099.html
by fading in along the seems with a rich bluetone rgb[0.0.255]. However I think this may create flat areas along the seams
I found latter another tutorial that helps with this issue in more detail.
http://www.andrewklein.net/bh/fix_normalmap_seams.html
Basically flipping channels should work in the uvs are flipped when uving. However since there is a front and back to my character flipping the channels would produce the same problem on the other side instead, or where the seam for the flipping occurred. Anyhow will see how Darren Elm looks latter and work with it if I have to.
I think I will need to be a little more clever with the UV placement , creating the front and back in one uv with the seams under the arms and down the sides of the chest.
If the problem is apparent after creating Darren, I will try transferring the high res model to X normal and see if that can resolve the issue.
Here is a wire frame of Darren Elm. To speed things up a little and since it really was not necessary to build a completely new body for Darren, I used George Elms body and reedited it for Darren, a bit of kit bashing that saved a days work.

Friday 2 July 2010
Friday, 02 July 2010
I have create the high res model for Ian Elm. It was rather quick, just adding similar details as the Ian model. There was no need to add any further details to hands and feet since they are only shown grasping the light stick at one point in the animation, and will not be featured heavily.

I realised latter I had attached the inner mouth to the same model, consequently the Normal and cavity map was ruined. Silly mistake due to rushing no doubt. Anyhow the second run at the high res model looks much better than the first.


Now I noticed latter there was some artefacts on the shoulders and top of the head, which I pinned down to the normal map between uv seams. You can see it on the render above where the arms join the chest at the shoulder.
I don’t know why the normal map was causing this strange seam effect but resolved the issue by de-saturating the normal map and fixing the seam problem by cloning, before taking it back into Photoshop and recreating the normal map from the grey scaled image. I think this got around the problem of the seams without having to clone the actual normal map.

And the character with hair (again reusing Ian’s hair and adjusting to fit the concept)

Wire frame

Final

Subscribe to:
Posts (Atom)